
Table of Contents
Every season change in a small home comes with the same quiet dread: where does the next four months of stuff actually go. The winter coats need somewhere the summer clothes just vacated. The holiday decor needs a shelf that’s currently holding beach gear. Without a basement, an attic, or a garage to absorb the overflow, a seasonal reset in a small space isn’t optional housekeeping. It’s the one system that keeps a small home from slowly filling up with things from every season at once, all competing for the same handful of shelves.
A seasonal reset means making four specific decisions, in order, every time the season turns: what gets decluttered before it’s stored again, what gets stored and where, what gets swapped into daily use, and what gets cleaned or maintained while everything’s already out and accessible. Done in that order, a reset takes an afternoon. Done out of order, or skipped for a season or two, it becomes the multi-day overwhelm project most people dread and put off.
This guide covers the full year’s rhythm. The Spring and Fall companion guides go deeper on the specific tasks for those two transitions.
Decision One: Declutter Before You Store
The single biggest mistake in any seasonal reset is storing everything from the outgoing season without looking at it first. That means the same unworn coat, the same never-touched holiday decoration, and the same ill-fitting swimsuit go back into storage untouched, taking up the exact same space they took up last year, for another six months.
Before anything goes into a bin, sort the outgoing season’s items into three groups: worn or used this season and worth keeping, not touched all season despite being accessible, and genuinely unsure. The middle group, the things that sat accessible all season and never got used, is the real target of a seasonal declutter. If a sweater sat on the rod all winter and never came off the hanger, that’s not bad luck. That’s a strong signal it’s not earning its place in next year’s rotation either.
The “genuinely unsure” pile gets a simple rule: if you can’t name a specific situation where you’d need it in the next year, it goes. Vague possibility (“might wear it sometime”) isn’t a strong enough reason to store something for another six to twelve months in a home that doesn’t have room to spare.
This declutter step should happen at every seasonal transition, not just spring cleaning once a year. A small home that only declutters once annually accumulates a full extra season’s worth of unnecessary stuff before it gets addressed, which is exactly the kind of buildup that turns a seasonal reset into an overwhelming task instead of a routine one.
Decision Two: Store What’s Leaving, Using Height Instead of Square Footage
Once the outgoing season’s items are sorted, what’s left needs somewhere to actually live for the next several months. Without a basement or attic, that storage has to come from vertical space already inside the home: under beds, on top of closets, inside ottomans, or on a high shelf that’s otherwise sitting empty most of the year.
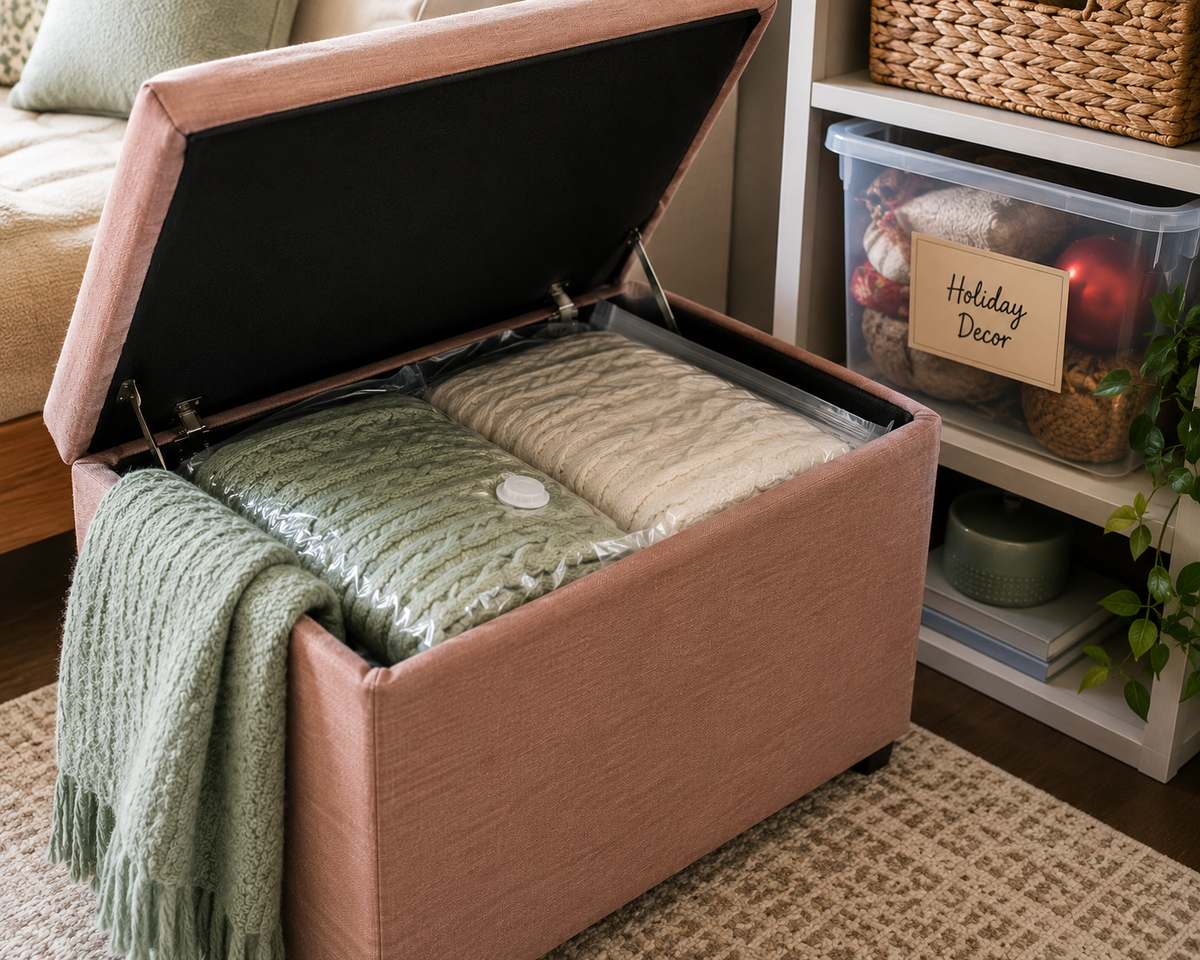
Vacuum-sealed bags work well for anything soft and bulky, winter sweaters, comforters, and spare bedding, compressing them down to a fraction of their size so they slide flat under a bed frame or stack neatly on a closet shelf. Clear, labeled bins work better for anything structured that shouldn’t be compressed, like folded sweaters you’d rather not vacuum-seal or holiday decorations that need protecting from getting crushed.
Label every container by season and category, not a vague general label. “Winter throw blankets” and “holiday decor, box 1 of 2” tell you exactly what’s inside without having to open every bin at the next transition just to find the right one. This single habit is what makes next season’s swap take twenty minutes instead of an hour.
If floor and shelf space genuinely run out, a storage ottoman at the foot of a bed or couch does double duty, holding a season’s worth of compressed bags while functioning as seating or a surface the rest of the year. This works especially well in a small living room or studio where visible storage bins would clutter a space that needs to read as calm rather than functional-looking.
Decision Three: Swap In What the New Season Actually Needs
With the outgoing season stored and decluttered, the next step is bringing in what the new season requires, and putting it somewhere genuinely accessible rather than just technically present. A common failure here is swapping the big items (clothes, bedding) but leaving smaller seasonal essentials buried in the same storage bin they’ve been in all along, which means they get dug out piecemeal over the following weeks instead of being ready on day one.
Build a short list specific to the season before starting the swap, rather than trying to remember everything from memory in the moment. A spring swap typically needs lighter bedding, rain gear moved to an accessible hook, and any winter-specific cleaning supplies (ice scrapers, snow boots) moved to deep storage. A fall swap typically needs the reverse: warmer bedding brought forward, a coat rack or hook cleared for heavier jackets, and summer-specific gear (beach towels, sandals) moved back.
Bring items in gradually rather than all at once if a season’s transition happens over a few unpredictable weeks rather than a single clean date. Keeping one lighter layer and one heavier layer both accessible during that overlap avoids the common trap of storing everything from the old season on the first mild day, only to need it again during a cold snap two weeks later.
Decision Four: Clean and Maintain While Everything’s Already Out
A seasonal reset is also the most efficient moment to handle maintenance tasks that are easy to skip the rest of the year, because the areas involved are already open, empty, or accessible in a way they aren’t during a normal week. Vacuuming under a bed that’s currently clear of its winter storage bins, wiping down an empty closet shelf before new bins go back on it, or checking window seals while swapping out heavier curtains all take a few extra minutes when the space is already disrupted, and cost a whole separate task later if skipped now.
Build this into the reset rather than treating it as a separate to-do. As each zone empties out during the store-and-swap process, take two minutes to clean it before anything new goes back in. A shelf wiped down while it’s briefly bare takes thirty seconds. The same shelf, once it’s loaded with bins again, becomes a project requiring everything to come back off.
This is also the natural point to check anything specifically tied to seasonal wear: closet rod hardware for signs of sagging after a full season of heavier winter coats, storage bin seals for cracking, or vacuum bag seals for holding air properly before they’re trusted with another six months of storage.

Doing This Room by Room Instead of All at Once
A whole-home seasonal reset can feel too large to start if it’s approached as one giant task. Breaking it into rooms, and tackling one room fully through all four decisions before moving to the next, keeps the project from stalling out halfway with half-decluttered piles in every room at once.
The bedroom usually goes first, since clothing and bedding make up the bulk of what’s actually swapping between seasons. The closet’s rod and shelves get the declutter-store-swap sequence, followed by the bed itself for seasonal bedding. The living room comes next, covering throw blankets, seasonal decor, and any seating cushions or covers that rotate with the season. Entryways and hallway closets come last, since they hold the transitional gear (umbrellas, seasonal shoes, coats) that tends to change more gradually as weather shifts rather than all at once on a single day.
Working room by room also makes it easier to spot when one room’s storage is genuinely maxed out and something needs to be decluttered rather than stored again, versus another room that still has real capacity to spare. A bedroom closet at its limit while a hallway closet sits half-empty is a sign that seasonal storage needs to be redistributed, not that more storage needs to be bought.
What a Reset Looks Like in a Studio or One-Room Space
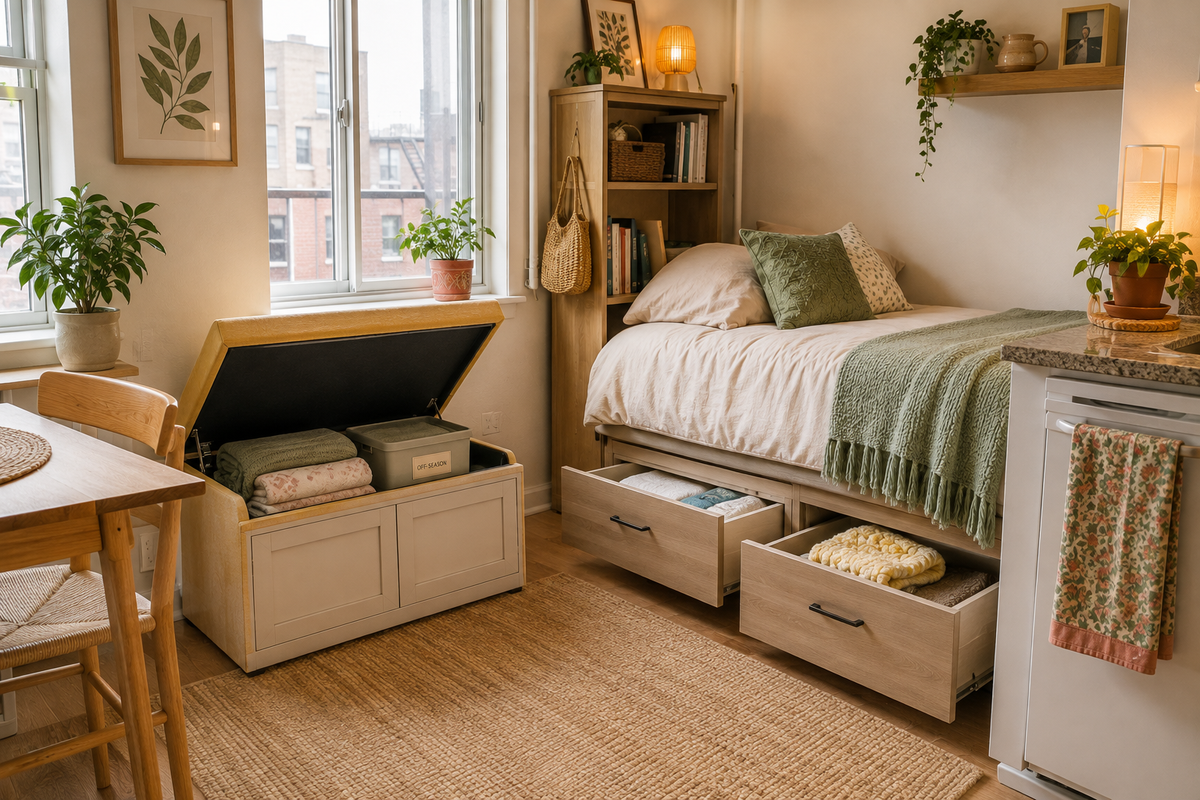
A studio apartment or a single-room living situation removes the option of spreading seasonal items across separate rooms, which means the order of operations matters even more. Without a spare bedroom closet or a separate hallway space, every seasonal swap competes for the same handful of storage zones: under the bed, inside furniture with hidden storage, and whatever vertical shelf space exists.
In this setup, furniture that doubles as storage becomes essential rather than optional. A storage ottoman, a bed frame with built-in drawers, or a bench with a lift-up seat all hold a season’s worth of items without adding a single visible bin to a room that has to function as bedroom, living room, and closet all at once. Prioritize decluttering more aggressively in a studio than in a larger home, since there’s simply less total storage volume to work with, and every item stored takes up space that’s also doing double duty as living space.
The four-decision order still applies here exactly as it does in a larger home. What changes is how much slack there is if a decision gets skipped. In a spare room or a garage, storing something you didn’t need to declutter costs a shelf. In a studio, it costs visible floor space in the one room you’re living in every day.
The Supplies Worth Keeping on Hand Year-Round
A reset goes faster when the same handful of supplies are already in the house rather than needing a store trip mid-task. A small kit kept together, ideally in or near wherever the seasonal storage itself lives, covers most of what any reset needs: a roll of fabric labels or a marker and blank tags, two or three spare vacuum bags for anything that wasn’t already sealed from last time, and one or two extra clear bins in case the outgoing season’s items don’t quite fit back into what was used last year.
This kit doesn’t need to be expensive or elaborate. A $20 to $30 investment in labels, a couple of spare bags, and one extra bin covers most small homes for years, since none of these items wear out quickly with only two uses a year. Keeping them together in a single spot, rather than scattered across a junk drawer, a closet shelf, and a kitchen cabinet, is what actually makes the difference between a reset that flows smoothly and one that stalls out looking for a marker.
Building a Reset That Takes an Afternoon, Not a Weekend
The difference between a reset that takes two hours and one that spirals into a full weekend project almost always comes down to whether the four decisions above happen in order, or all at once in a jumbled pile on the bed. Doing them in sequence, declutter first, then store, then swap in, then clean, means each step only touches what it needs to and doesn’t get slowed down by decisions that belong to a different step.
Keep the actual supplies for a reset stored together in one place, ideally near where the seasonal storage itself lives, so the reset doesn’t stall out on a mid-task supply run. A reset that requires a store trip halfway through is a reset that gets abandoned and finished three weeks late.
Tie each reset to a natural trigger rather than a fixed calendar date, since actual weather rarely lines up perfectly with the calendar anyway. The first genuinely cold week, the first genuinely warm week, these give a concrete, felt signal that it’s time, rather than an arbitrary date that might land two weeks before or after the weather actually shifts.
FAQ
How long should a full seasonal reset actually take? For most small homes, two to three hours covers all four decisions: decluttering, storing, swapping in, and light cleaning. A reset that regularly takes a full weekend usually means declutter decisions were skipped at a previous transition and are now backed up.
Do I need to do a full reset four times a year? Two major resets, spring and fall, cover most of the heavy lifting for clothing and bedding. Summer and winter often need smaller adjustments rather than a full reset, since they’re extensions of what spring and fall already set up.
What if I don’t have under-bed clearance or a spare closet shelf? A storage ottoman, a slim rolling cart with drawers, or a labeled tote in a hallway closet all work as substitutes, as long as whatever’s storing the off-season items is labeled well enough to find quickly at the next swap.
How do I stop the “genuinely unsure” pile from just going back into storage every time? Set a real deadline on it. If something’s been in the “unsure” pile for two consecutive seasonal resets without being used, that’s a strong enough signal to donate it rather than store it a third time.
Related Reading
For the specific spring tasks this guide’s seasonal framework leads into, The Spring Reset Checklist for a Small Home covers clearing out winter buildup room by room.
When fall approaches, The Fall Reset Checklist Before Everything Moves Indoors covers getting a small space ready for the season it gets used most.
And for the storage side of the swap itself, Rotating Seasonal Storage Without a Basement or Attic goes deeper on where off-season items actually live in a home with no extra room to spare.
For the full category, browse Seasonal Resets under the Seasonal & Maintenance hub, home to every reset checklist and maintenance routine on the site. If storage itself is the bigger challenge, the Organization & Storage hub covers decluttering and storage systems in more depth.